Every once in a while I’m posting solution to some crackme that I consider interesting. By interesting, I mean the solution, so it is not exactly about key generation algorithm but also about technology and tricks that are utilized. Looking at the traffic statistics, it seems that this topic isn’t exactly the one that people would like to read (three posts – 5,63% of total unique page views), but I’m truly convinced that it has great potential for every single person that wants to learn something new. All in all, there is at least one person that benefits from those tutorials – ME :) Back to the topic, in this post I’ll describe warsaw’s Java Crackme 3. Crackme was published on 14th October 2012 on crackmes.de, I’ve picked it up around February 2013, so literally speaking, it took me one year to solve it (of course I had some huge breaks meanwhile). Difficulty of the crackme was set to 5 (Professional problem to solve) in the crackmes.de scale and I must fully agree with it. It is Java crackme, but it wasn’t written in Java, I’m 99% sure that it was written in Jasmin or other assembler for Java Virtual Machine (JVM). Hand-crafted assembler and bunch of obfuscation tricks renders all existing decompilers pretty much useless, so it will not be yet another simple Java analysis.
Table of Contents
- First Blood (initial analysis)
- First Blood Part II (second attempt)
- Obfuscation tricks
- Algorithm analysis
- Algorithm reversing
- Final words
First Blood (initial analysis)
Crackme is shipped as a JAR file, there is one .class file inside called CON.class. I’m not sure how it looks on UNIX but on windows CON is forbidden name and CON.class file cannot be easily created on disk, so to unpack this file, one need to change file name inside JAR archive (or use 7zip, it changes it to _CON.class automatically). Such file with changed name will not run, as JVM treats file name as a class name. To get it working without jar file, class name inside a .class file needs to be changed to _CON, but I’ll get back to this topic later. JAR file with crackme is very small: 2620 bytes, it doesn’t have any fancy GUI, just command line interface:
x:\xxx>java -jar crackme3.jar Please enter a key on the command line. x:\xxx>java -jar crackme3.jar test Incorrect! |
As a first step, I’ve tried to use java decompiler, but results generated by JD-Gui and JAD are not even worth mentioning. My second try was dirtyJOE, as it is really nice tool to quickly check what is really inside a .class file. There is only one method defined: main, it has 22 exception records (it doesn’t look good, trust me) and the code is pretty much mind blowing. There are a lot of monitorenter/monitorexit opcodes, some random goto, few jsr (jump subroutine) and even one athrow. Level of complication is nicely visible on the screen-shot from IDA graph view:
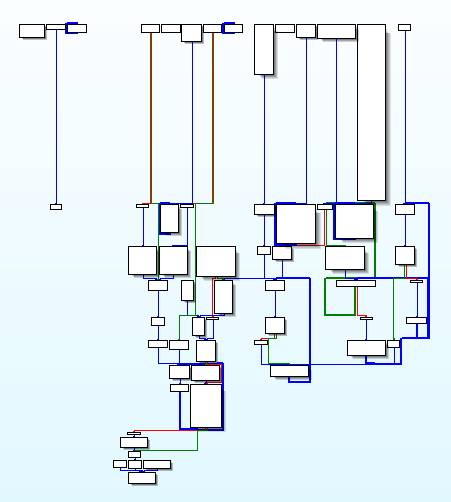
As you can see, there are multiple entry points to the main method, there are even separate group of blocks not connected with the main execution path. I had an idea to manually rebuild proper code flow and recompile it so maybe some decompiler would work with this code, but I’ve realized rather quickly that it doesn’t make any sense, as I’ll not be able to properly rebuild all those peculiar links between so many exception handlers. That was the end of my first attempt at this crackme. What I knew, is that I need java bytecode debugger and it doesn’t exist…
First Blood Part II
Second attempt was taken few months later, after researching java bytecode debugging stuff. You can read about it in my previous post: Java bytecode debugging. As I’ve mentioned in that post, there was still something missing to fully experience java bytecode debugging in a fashion similar to x86 debugging:
(…) Java VM is a stack based virtual machine, which means that most of all opcodes operates on the operand stack. Having information about values pushed onto the stack sometimes can be crucial to understand what is really going on. Unfortunately neither JDB nor JSwat supports previewing of jvm operand stack. This is an unresolved problem for now.
Well, recently I’ve resolved this problem and it enabled me to properly debug this crackme. I’ve wrote small tool called JVM Operand Stack Viewer (very original name!) – currently it’s private, because it wasn’t extensively tested – but I’ll be merging it with dirtyJOE very soon (or not), so stay tuned. Below you can find screen-shot of my java debugging environment, it is basically:
- JSwat debugger with .class file augmented by Restore Debug Info feature of dirtyJOE
- dirtyJOE Opcodes Help
- JVM Operand Stack Viewer

Armed with all those tools I could finally analyse algorithm responsible for serial checking.
Obfuscation tricks
In this paragraph I’ll describe some obfuscation tricks used by the crackme. I’ll also write about modifications that I’ve applied to the .class file before I’ve started debugging session. Let’s start with obfuscation:
Exceptions in this crackme are used as a standard method to change execution flow, behaviour is pretty much similar to SEH based execution path modifications on x86 Windows, or maybe rather x64 exceptions, as JVM uses exception table similar to x64 Windows:
Start | End | Handler | Type -------------------------------------------------------------------------------- 0002 | 0007 | 022F | CONSTANT_Class : java/lang/IllegalMonitorStateException 0000 | 0007 | 00A4 | any (finally statement) 0007 | 000B | 00EB | CONSTANT_Class : java/lang/IllegalMonitorStateException 0007 | 0015 | 00DE | any (finally statement) 0017 | 001C | 0244 | any (finally statement) 001C | 0034 | 029C | any (finally statement) 0059 | 0062 | 0002 | any (finally statement) 0062 | 007A | 0014 | any (finally statement) 007A | 007F | 022F | any (finally statement) ... |
Exceptions in this crackme are triggered by various types of instructions:
- athrow – the simplest one, just throws requested exception, no matter what
- monitorexit – this one is probably the most interesting, as it throws exception only if there wasn’t any monitorenter for the requested object. If there were multiple monitorenters, then monitorexit can be called multiple times. Basically monitorenter increments reference counter, and monitorexit decrements it, if reference counter goes below 0 it will throw exception.
- caload – load char from array, in case of null array reference, or index out of bounds it throws exception
- idiv – throws exception in case of division by 0
- checkcast – check whether object is of given type, quote from documentation: “If objectref is null or can be cast to the resolved class, array, or interface type, the operand stack is unchanged; otherwise, the checkcast instruction throws a ClassCastException.”
I’m not sure if those are all opcodes used to change execution flow, I think that I might have missed castore, but it is identical to caload (just store, not load) and those mentioned here are the most important anyway.
JSR (jump subroutine) instruction is very similar to x86 call, it can be used with corresponding RET opcode to implement some finally mechanism of Java language:
The jsr instruction is used with the ret instruction in the implementation of the finally clauses of the Java programming language (see Section 7.13, “Compiling finally”). Note that jsr pushes the address onto the operand stack and ret gets it out of a local variable. This asymmetry is intentional.
In this crackme, JSR is used to achieve two different goals. First, it is used as an obfuscation:
... 0000007F: pop2 ... 00000126: jsr pos.0000007F ;never return from this jsr |
Above code is equivalent of goto, it is also very similar to x86 call/pop or call/add esp. Second usage is more standard, because it serves as a call to local functions defined in main method.
GOTO opcode is used as a simple flow obfuscation method, this technique is identical to jmp-based flow obfuscation used on x86 platform.
There is quite nice anti-disasm trick, although I don’t know which disassembler is a target ;). In a constant pool of a class file, there is a definition of a long string which contains output of some java disassembler. This string is used as a name for some variables, it is also used as an input string in part of the serial check routine. This long string messes up output of decompilers and disassemblers and might confuse some inexperienced reversers.
Modifications applied before debug session
I’ve done only few small patches for easier debugging:
- dirtyJOE -> Restore Debug Info – this is inevitable to do bytecode level debugging, but it is for free since it is already implemented in dirtyJOE
- I’ve mentioned earlier that there is some long string used as a name for some variables. It doesn’t look good on disassembly and it doesn’t help that three different variables has the same name. Those variables differs by type, so I’ve decided to call them var_int, var_char and var_short. This change can be easily done on dirtyJOE Constant Pool tab, procedure is very simple:
- Add CONSTANT_Utf8 item with the new name for variable, for example “var_short”
- Usually there will be also CONSTANT_NameAndType entry corresponding to each variable from the Fields tab, to find the proper one, one need to search for the entry with proper type, for example “S” (short)
- Edit Name part in found CONSTANT_NameAndType entry, just choose new name from the drop down list (“var_short” should be there)
- On the Fields tab, set Name entry to the new name
- Last change is related to the class name, as I didn’t want to constantly fight with this CON problems. I’ve changed file name to _CON.class, so I had to change class name inside .class file to the _CON as well. It was very tempting to just change CONSTANT_Utf8 “CON” entry on constant pool to “_CON”, but there is small got-cha, “CON” entry is also used as a string in serial checking routine (situation similar to this long string described earlier), so the proper way was, to add separate CONSTANT_Utf8 entry with “_CON” name, and set this item as a class name in CONSTANT_Class entry that currently reference “CON” string.
At this point tools are ready, crackme is ready, all preparations are finished, so it is time to start the analysis of the algorithm.
Algorithm analysis
At the beginning, crackme pre-calculates some constant char array that is used later. Calculations takes place inside subroutine at address 0x1E1 (addresses in Java are relative to the method start), so I’ll be referring to this function as sr_01E1(). It takes four arguments of char array type. This function is also used once again during serial check and I’ll describe its internals at that point. For now I’ll just list the arguments of the current call, and generated output:
arg1 = "CON"; arg2 = "'\r\n 7:\tastore_0\r\n 8:\ticonst_0\r\n 9:\taaload\r\n 10:\tin";//** arg3 = arg1; arg4 = arg2; -- output_c1 = { 0x00D9, 0x00B9, 0x00B0, 0x0040, 0x0040, 0x0040, 0x006E, 0x0074, 0x0012, 0x00C2, 0x00E6, 0x00E8, 0x00DE, 0x00E4, 0x00CA, 0x00BE, 0x0060, 0x001A, 0x0014, 0x0040, 0x0040, 0x0040, 0x0070, 0x0074, 0x0012, 0x00D2, 0x00C6, 0x00DE, 0x00DC, 0x00E6, 0x00E8, 0x00BE, 0x0060, 0x001A, 0x0014, 0x0040, 0x0040, 0x0040, 0x0072, 0x0074, }; // ** |
** – arg2 and output_c1 are cropped to increase readability, they’re also converted to char array (toCharArray())
Just a quick reminder, char in Java is 16bit, so do not confuse it with C char. Serial number taken from the command line is converted to char array, and preprocessed to another char array by below code:
000000C3: bipush 127 000000C5: newarray atype:char 000000C7: astore_0 000000C8: iconst_0 000000C9: istore_2 000000CA: iconst_0 000000CB: istore_3 000000CC: goto pos.0000024A ... 0000024A: aload_0 0000024B: iload_2 0000024C: iconst_4 0000024D: idiv 0000024E: iload_3 0000024F: getstatic short _CON.var_short 00000252: ishl 00000253: aload local.04 00000255: iload_2 00000256: caload 00000257: bipush 36 00000259: invokestatic int java.lang.Character.digit(char, int) 0000025C: ixor 0000025D: dup 0000025E: dup 0000025F: getstatic int _CON.var_int 00000262: iadd 00000263: putstatic int _CON.var_int 00000266: istore_3 00000267: castore 00000268: iinc local.02, 1 0000026B: goto pos.0000024A |
Translating it to Java is rather simple task:
var_short = -8444; //0xFFFFDF04 index = 0; val = 0; post_serial array = new char[127]; while(true) { val = (val << var_short) ^ Character.digit(serial_array[index], 36); var_int += val; post_serial_array[index / 4] = (char)val; index++; } |
Integer shift operations in Java are cropped to 5 bits (Long shifts are cropped to 6 bits), which means that shift by -8444 is the same as shift by 4. Above code translates every 4 characters from serial number to 16bit value. It is using base36 on every single character, so it can be reduced to base16, as every 16bit value can be represented by 4 base16 characters. So, in theory serial number is alphanumeric, but in practice it can be treated as a hexadecimal string. I haven’t analysed this encoding further, but it is of course possible to generate proper serial number with all alphanumeric characters. post_serial_array[] has maximum size set to 127, which means that serial number can by as long as 4*127=508 characters. You may also noticed that there is var_int variable touched by this loop, this variable is modified by various parts of the crackme, and it’s even used as an input for some calculations, but the truth is that it doesn’t interfere with serial checking, so the only purpose of this variable is an obfuscation (var_char has the same purpose but it didn’t appeared yet). Below you can see small example of code that is fooling around with var_int:
000000FA: getstatic int _CON.var_int ;place after serial preprocessing 000000FD: bipush -70 000000FF: sipush 662 00000102: imul ; -70 * 662 = -46340 00000103: irem ; Y = var_int - (var_int / (-70 * 662))*(-70 * 662) 00000104: dup 00000105: dup 00000106: imul ; Y*Y 00000107: iconst_1 00000108: iadd ; Y*Y + 1 00000109: iadd ; Y*Y + 1 + Y 0000010A: dup 0000010B: dup2 0000010C: putstatic int _CON.var_int 0000010F: goto pos.0000000B |
After serial preprocessing, there is a loop that is using data from post_serial_array[] and from output_c1[]:
int c1_idx = 0; int sr_idx = 0; int[][] local4 = new int[2][53]; do { local4[(sr_idx + c1_idx) & 1][(sr_idx + c1_idx) / 2] += (post_serial_array[sr_idx] * output_c1[c1_idx]); // there is small chunk of code that is missing here but it's not // used by the crackme for the given output_c1 and any serial number c1_idx = (var_int + c1_idx) % 89; sr_idx = (var_char + sr_idx) % -17; } while (0 != (sr_idx | c1_idx)); |
It looks complicated as hell, but in fact it is easy. Nevertheless, it took me a while to figure what it really does. Loop is always executed 1513 times, 89 * 17 = 1513, so it seems that it can be represented as a two nested for loops:
for (int c1_idx = 0; c1_idx < 89; c1_idx++) for (int sr_idx = 0; sr_idx < 17; sr_idx++) { ... } |
It tells us, that only 17 16bit values from post_serial_array[] are used and 89 values from output_c1[] array. To prove that those loops are the same I need to explain those two modulo operations that are used to advance c1_idx and sr_idx indexes. 89 and 17 are prime numbers, var_int and var_char must be coprime to them accordingly (which means, that var_int != N*89 and var_char != M*17), if this condition is met var_int % 89 (var_char % 17) is the generator of additive group modulo 89 (17). I haven’t checked if it is possible to input serial that will generate var_int (var_char) that isn’t coprime to 89 (17), but such analysis is not really required to solve the crackme (I suspect that calculations done over var_int and var_char eliminates this case anyway). One thing left from that loop is two dimensional local4[][] array, its content after execution is as fallow:
// to simplify output: // - output_c1[] will be just c[] // - post_serial_array[] will be s[] local4[0][0] = s[0]*c[0]; local4[1][0] = s[0]*c[1] + s[1]*c[0]; local4[0][1] = s[0]*c[2] + s[1]*c[1] + s[2]*c[0]; local4[1][1] = s[0]*c[3] + s[1]*c[2] + s[2]*c[1] + s[3]*c[0]; local4[0][2] = s[0]*c[4] + s[1]*c[3] + s[2]*c[2] + s[3]*c[1] + s[4]*c[0]; local4[1][2] = s[0]*c[5] + s[1]*c[4] + s[2]*c[3] + s[3]*c[2] + s[4]*c[1] + s[5]*c[0]; local4[0][3] = s[0]*c[6] + s[1]*c[5] + s[2]*c[4] + s[3]*c[3] + s[4]*c[2] + s[5]*c[1] + s[6]*c[0]; local4[1][3] = s[0]*c[7] + s[1]*c[6] + s[2]*c[5] + s[3]*c[4] + s[4]*c[3] + s[5]*c[2] + s[6]*c[1] + s[7]*c[0]; // ... |
Full table available here: local4_filling. For now I’ll leave this array as it is, I’ll explain those calculations later. In the next step, local4[0] and local4[1] arrays are converted into char arrays by below subroutine:
char[] sr_0235(int[] t) { char[] ret = new char[2*t.length]; for (int i = 0; i < t.length; i++) { ret[2*i + 0] = (char)(t[i] & 0xFFFF); ret[2*i + 1] = (char)(t[i] >> 16); } return ret; } |
It just splits every integer value into two char values, nothing complicated here. Let’s call those new arrays t1 and t2:
char[] t1 = sr_0235(local4[0]); char[] t2 = sr_0235(local4[1]); |
t2 array is concatenated with “I” char:
0000028D: invokestatic java.lang.String java.lang.String.valueOf(char[]) 00000290: ldc "I" 00000292: swap 00000293: invokevirtual java.lang.String java.lang.String.concat(java.lang.String) 00000296: invokevirtual char[] java.lang.String.toCharArray() |
// t2 = "I".concat(String.valueOf(t2)).toCharArray(); // |
It is now time to get back to sr_01E1() mentioned at the beginning of this paragraph. It is called with below arguments:
arg1 = "Correct!".toCharArray(); arg2 = "Incorrect!".toCharArray(); arg3 = t1; arg4 = t2; |
Those four char arrays are combined into new char array that is constructed by adding elements from each input array at each position: arg1[i] + arg2[i] + arg3[i] + arg4[i]. If calculated value exceeds char boundaries, then low 16bits are stored as a char at i-th position and high 16bits are carried to the (i + 1) element calculation. Overall, it looks like plain big number addition. Noticing this fact is a big step towards final solution, but it will be discussed later (of course!). Let’s call this new array sum[]:
char[] sum = sr_01E1("Incorrect!", "Correct!", t1, t2); |
One more thing about sr_01E1(), it starts with carry value set to 5, so 5 is like an additional argument added to the four input values. sum[] array is used as a parameter to yet another subroutine, lets call it sr_0274(), this subroutine is called twice and operates on double values (yay!):
double sr_0274(char[] t, double d) { double ret = 0.0; for (int i = 0; i < t.length; i++) { //ret = (ret + ((t[i] * Math.pow((double)2, (double)(-1048 + (i << 4)))) % d)) % d; //splitted for sake of readability double pow2 = Math.pow(2, -1048 + (i << 4)); pow2 %= d; ret = (ret + t[i]*pow2) % d; } return ret; } |
Above function is called with below arguments:
double da = sr_0274(sum, 1.112536929253537e-308); double db = sr_0274(sum, 1.112536929253532e-308); |
At the end da is added to db and compared to 0.0 (yes, comparison is made on double type):
0000016B: dload local.04 0000016D: dadd 0000016E: dconst_0 0000016F: dcmpl |
If da + db == 0.0 it prints “Correct!”, otherwise it prints “Incorrect!”.
Algorithm reversing
Earlier, I’ve made some statements that fosters reversing, I mean the one about big number addition. As I said, noticing it, was a big progress (so, some of you may already decoded other operations), but lets ignore it for now and analyse other parts of the code. The whole process is called reversing, so I’ll start from the end :). sr_0274() is a good candidate to start, as it is the last piece of serial verification. Printing each iteration as an equation helps with understanding what is really happening:
0: ret = (ret + (t[0]*(2^-1048)) % d) % d 1: ret = (ret + (t[1]*(2^-1032)) % d) % d 2: ret = (ret + (t[2]*(2^-1016)) % d) % d 3: ret = (ret + (t[3]*(2^-1000)) % d) % d 4: ret = (ret + (t[4]*(2^-984)) % d) % d 5: ret = (ret + (t[5]*(2^-968)) % d) % d 6: ret = (ret + (t[6]*(2^-952)) % d) % d 7: ret = (ret + (t[7]*(2^-936)) % d) % d ... 99: ret = (ret + (t[99]*(2^536)) % d) % d 100: ret = (ret + (t[100]*(2^552)) % d) % d 101: ret = (ret + (t[101]*(2^568)) % d) % d 102: ret = (ret + (t[102]*(2^584)) % d) % d 103: ret = (ret + (t[103]*(2^600)) % d) % d 104: ret = (ret + (t[104]*(2^616)) % d) % d 105: ret = (ret + (t[105]*(2^632)) % d) % d |
Analysing this loop on double values gave me a headache, at some point I’ve switched to hexadecimal representation (Double.doubleToLongBits()). I was playing a bit with values in t[] array and watching how the output is changing. I was also printing partial results like t[i]*(2^n), (t[i]*(2^n))%d etc, virtually everything that can help me in achieving the goal. Constants passed to sr_0274() are also better looking in hexadecimal form:
A = 1.112536929253537e-308 = 0x0007FFFFFFFFFF7F B = 1.112536929253532e-308 = 0x0007FFFFFFFFFF75 |
It is worth noting that both values fits in 52 bits. Double representation in Java follows IEEE 754 standard, it defines double as 64bit value, where 1 bit is used as a sign, 11 bits are used as an exponent and mantissa is stored in the remaining 52 bits. So, constants from the crackme are using only mantissa part, is it anyhow helpful? Actually yes, I’ve made a nice observation, that simplifies things a lot. Double modulo operation for values that fits in mantissa part can be freely changed to integer modulo! Thinking about previously mentioned big number addition, I’ve decided to look at a big number modulo algorithms. I’ve found this article: http://www.devx.com/tips/Tip/39012 and it confirmed my theory, that sr_0274() might by just big number modulo. Lets try to put together some initial calculations that I’ve recovered up to this moment:
// sum[] -> char array produced by sr_01E1(), let's call it just sum (sum % A) + (sum % B) = 0; // sum is always above 0, so above can be represented as: sum % (A*B) = 0; // and after further transformation sum = N*A*B; |
sum[] is a result of an addition of a few values: bignumbers made from “Incorrect!” and “Correct!” char arrays, const value 5 and two bignumbers made from t1[] and t2[] char arrays. As I’ve described earlier, t2[] is concatenated with “I” char, to simplify the things, I’ve to represent this concatenation as a mathematical operation:
t2 = "I".concat(String.valueOf(t2)).toCharArray(); "I" -> 0x49 concat -> it works like left shift by 16 bits, or multiplication by 0x10000 t2 = (t2 * 0x10000) + 0x49 |
Updating calculations:
incor = bignum("Incorrect!") cor = bignum("Correct!") sum = incor + cor + 5 + t1 + (t2 * 0x10000) + 0x49 // so incor + cor + 5 + t1 + (t2 * 0x10000) + 0x49 = N*A*B |
t1[] and t2[] arrays are results of yet unknown operation that strangely resembles bignum multiplication. I’ll not go into the details as it would probably took to much space and I’m not sure if it would be clear enough, but the algorithm used in the crackme is standard long multiplication algorithm, it is optimized to use chunks of 16bit data, but it’s just an implementation detail. t1 + (t2 * 0x10000) is the final addition for the multiplication algorithm, so calculations can be updated again:
C -> bignum(output_c1) Serial -> bignum(post_serial_array) t1 + (t2 * 0x10000) = Serial*C // so Serial*C + incor + cor + 5 + 0x49 = N*A*B |
At this point there are two unknown values in the equation: Serial and N. I’ll transform current equation to the form that will calculate Serial number:
Serial*C = N*A*B - incor - cor - 5 - 0x49 Serial = (N*A*B - incor - cor - 5 - 0x49) / C |
Both Serial and N values has to be Integer numbers, this information allows me to write below equation:
(N*A*B - incor - cor - 5 - 0x49) % C = 0 //it can be further transformed to the form of standard linear congruence ax = b (mod c) N*A*B = incor + cor + 5 + 0x49 (mod C) // a = A*B // x = N // b = incor + cor + 5 + 0x49 // c = C |
Solving linear congruences requires extended Euclidean algorithm, values used by the crackme are chosen in the way that it is possible to solve it. Final solution:
// EGCD() - extended Euclidean algorithm N = EGCD(A*B, C) Serial = (EGCD(A*B, C)*A*B - incor - cor - 5 - 0x49) / C |
Correct serial number:
"5876C9436400AD9AC7BA037602CD4261D2C87DB8FAA9F921A93AB2DDFA2C0215" |
Keygen:
Crackme3Kgn.java
Final words
That was quite long solution, I hope some people made it till the end. It could be even longer, but I’ve decided to skip some details for clarity. I’ve never thought that java crackmes can be as tricky as x86, but this crackme proved it. It is also a great example to learn various topics like: java bytecode level analysis and debugging, big numbers algorithms, solving linear congruences. As a bonus, last year dirtyJOE development was mainly driven by this crackme. That’s all for now.
I have just one word … WOW !
You are awesome :O
I must admit I understood 20% of the tutorial … but it was a good read (I’ll need to re-read it at least a couple of time more, just to get the general idea I guess :P)
Thank you so much for publishing it.
Best Regards,
Tony
Thanks!
Great tutorial, do you know in which framework was the cm created?
Afaik it was custom java assembler that evolved into this toolset https://github.com/Storyyeller/Krakatau
Hi ReWolf,
I’m trying to reverse a heavily obfuscated Java malware. I’m getting crazy, because as you are mentioning, there is NO tool that prints a stack dump. I was looking for something a la ollydbg for Java, but no luck, nothing exists.
I’ve few questions about your “JVM Operand Stack Viewer”, I understand that you won’t give it away :(, but I’m interested in knowing your approach. I’m more used to RE x86(_64) files than java :P.
Is there a way to contact you, maybe on IRC ?
Thanks,
Flo
You can reach me on ircnet, nick rwf.
Simple & Best Tool ..
Thank’s..
wtf, that`s crazy , ReWolf rules!