I’m not quite sure how I ended up deep inside DOSBox debugger, going through 16bit assembly and recovering decompression routine used to handle MM3.CC file, but it was definitely fun. I got the game from one of the recent humble bundles and somehow (this is the part that I’m missing) I’ve found Jeff Ludwig’s page. I’ve read about his approach to modding Might and Magic III and problems related to compressed/encrypted MM3.CC data file. One of the phrases sounded like an invitation:
“It turns out that this algorithm has been a particularly tough nut to crack, and no one has come up with a viable way of decrypting the data.”
I recommend reading the whole story as his method of dealing with this problem is also great. In this post I’ll describe how I’ve handled it, in the end there will be link to the open source utility that can not only decompress, but also compress valid MM3.CC file.
DOS Packer
Quick look at MM3.EXE reveals that it is compressed DOS executable with some not compressed overlay that starts with FBOV magic. I have no idea about exe-compressors from the DOS era, but I’ve found that Jeff Ludwig used something called “Universal Program Cracker” version 1.11 coded by Synopsis. I’ve found version 1.10 of this tool (! Release Date: 06 – 25 – 1997 !) and it successfully unpacked working executable. It was even able to properly handle overlay data. Even though I had unpacked executable, I wanted to know the name of the packer used. One of my friends told me to try Detect It Easy and he was right as it was able to detect:
EXECUTRIX-COMPRESSOR(-)[by Knowledge Dynamics Corp]
Borland TLINK(2.0)[-]
If any of you is interested in computer history, there are some old threads on google groups mentioning this piece of software (dated back to 1991 and 1995):
https://groups.google.com/forum/#!topic/comp.os.msdos.programmer/QsjHLY6Kb4s
https://groups.google.com/forum/#!topic/comp.compression/IAj2-VHbtl4
IDA DOS loader
Having unpacked executable is a good start, but having proper disassembly is way more important. Unfortunately IDA had hard times loading this executable. It properly detects overlay, but fails at loading it. After quick look at the code, it turned out that analysis without overlay would be rather painful, as there are obviously missing parts in the code (even though decompression routine is stored inside the executable). I had to take another look at IDA DOS loader and maybe figure out how to load this overlay. Querying google for “FBOV” dos overlay brings source code of IDA DOS loader as a first result, which confirms that IDA should properly load this type of overlay. I’ve recompiled debug version of IDA DOS loader, and traced it in Visual Studio to see why it fails. To understand where the problem was, I need to describe a few internals of FBOV structure. FBOV header is described by below structure:
#define FB_MAGIC 0x4246 #define OV_MAGIC 0x564F struct fbov_t { ushort fb; // = FB_MAGIC ushort ov; // = OV_MAGIC uint32 ovrsize; uint32 exeinfo; int32 segnum; }; |
exeinfo is an offset (absolute to the beginning of the MZ header) to the array of structures that describes each segment stored in the overlay. segnum is the number of segments, which are described by below structure:
struct seginfo_t { ushort seg; ushort maxoff; ushort flags; ushort minoff; }; |
That’s the theory and IDA DOS loader implements it in the LoadCppOverlays() function. In case of this executable, this theory fails, but it fails only by a “few” bytes. During debugging session I’ve figured out that exeinfo points to the place just after mentioned array of segments. I’ve added one line to LoadCppOverlays():
fbov.exeinfo -= fbov.segnum*sizeof(seginfo_t); |
This simple fix enabled IDA to properly load overlay data and analyse whole executable. I haven’t found any FBOV documentation (neither official, nor unofficial), so I can’t confirm if there are multiple different implementations of FBOV overlays. I’m rather sure that IDA DOS loader implements proper version, as someone who wrote it probably based it on some real life examples. Maybe MM3 difference stems from some unpacking quirks, who knows.
Locating Decompression
I’ll not go into much details regarding process of locating decompression routine as it was neither hard nor interesting. I’ve used DOSBox debugger and set a breakpoint on int 21h (standard interrupt for handling DOS API interface), particularly interesting functions were 3Dh (open file), 3Fh (read file) and 42h (seek file). After some short period of time I was able to identify decompression routine.
Algorithm Analysis
Nowadays most of (de)compression related reverse engineering work is done by Hex-Rays Decompiler, so it is nothing particularly hard, albeit it still requires some patience to get everything right. Unfortunately there is no Hex-Rays for 16-bit x86 assembler and probably there won’t be, as it’s pretty much dead platform these days. For me this analysis was like time travelling back to 2005/2006 when I wrote my first static unpackers. It was time of IDA 4.9, so there wasn’t even interactive graph-view mode, which was first introduced in march 2006 (IDA 5.0 changelog). I’m mentioning interactive graph-mode here on purpose, because (at least for me) it was breakthrough technology that drastically sped up reverse engineering of various algorithms. Below you can find graph overview of the decompressor:
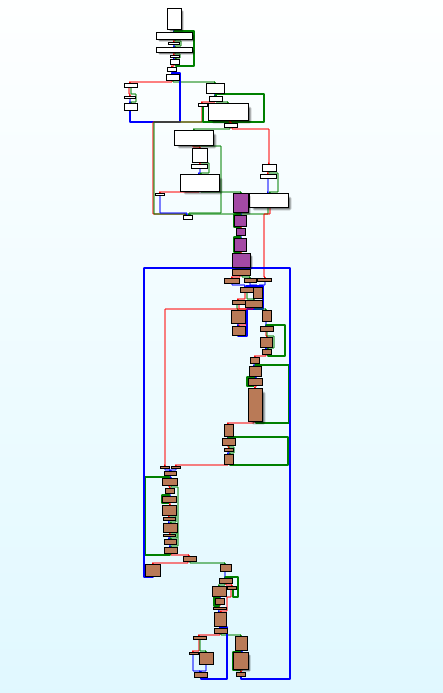
Purple blocks are responsible for algorithm initialization, brown are main decompression loop and white ones are related to memory handling and partially to CC file structure parsing. Recovering algorithm directly from assembly code usually consists of few phases:
1. Gathering known data – difficulty of this phase strongly depends on the complexity of the algorithm. One need to gather information about input and output buffers, all possible temporary buffers, variables used throughout the function (local and global) and last but not least constant data that might be also used during some calculations. To simplify things, all CPU registers should have assigned variable that has a name similar to the register (for example _ax, _bx, _cx etc). Type of the variable should correspond to the size of the register, in this case it would be uint16_t. In some cases it is better to represent registers as unions, so accessing 8-bit parts of registers wouldn’t be too painful. Local and global variables can be tricky, especially at the beginning of the analysis, because one doesn’t have full knowledge if particular variable is a simple type that occupies 1/2/4 bytes of memory or maybe an array. If there are multiple memory accesses at addresses that are close to each other, it is usually safe to declare such memory as an array, and later split it to separate variables if there are no array-like accesses. This advice is especially useful for local variables, so all esp/ebp related accesses should be handled through the array (let’s call it _stack for simplicity). During this phase it is very important to initialize all known data.
2. Loops identification – this is the most interesting phase (at least for me). IDA‘s interactive graph-view is probably one of the best tools to execute it. It is good to start from the simplest innermost loops and move “up”. Each loop can be given a different colour and grouped. Grouping loops simplifies graph overview and hiding grouped innermost loops helps with identification of loops that are one level up and so on.
3. Code rewriting – probably the most tedious part, rewriting each opcode/group of opcodes to high level language statements, basic block by basic block. If all loops were properly identified, it shouldn’t be too hard, but as any other tedious task it is error prone. The only part of logic that left are conditional expressions, which are easy to translate to higher level languages. It is good to mark processed basic blocks with different colour to avoid later confusion (if for example whole work is split between few days).
4. Checking correctness – in most cases it will not work at first run. Mistakes committed during any of three first stages are common and hard to spot. Fixing those problems usually requires long debugging sessions with two debuggers running side by side (original code versus recovered one).
5. Code beautification – after successfully finishing phase 4 it is good to go through the whole code and finally resolve all uncertainty regarding variables, arrays and constants. It is also good to give proper names to variables and eliminate all unnecessary constructions that mimic assembly. Ideally after this phase there shouldn’t be any variables named after x86 registers or arrays simulating stack. It should look like legitimate high level code.
Back to the Might and Magic III, I’ve roughly followed all steps and at the end I had a working decompressor. To avoid mistakes mentioned in point 4, I had a debugger with an original code open and I was checking each rewritten basic block if it generates the same output as the original one. I went through all compressed streams from MM3.CC and I couldn’t trigger one part of the decompression algorithm, so I temporary left it empty. Red blocks on the below graph shows the part that is never executed for the given game files.

At this point, I’ve started searching on google for the name of the algorithm. I was looking for hexadecimal constants that can be found in disassembly and word “decompress”:
"0x13A" decompress
"0x4E6" decompress
"0x274" decompress
"0x139" decompress
"0xFC4" decompress	<- this one was a partial success
I've found source code of an unpacker for some old Amiga file format. Except 0xFC4 constant there were also constant tables that are present in MM3 decompressor as well. It turned out that MM3 uses LZHUF algorithm (original implementation). I've used this knowledge to further beautify my reverse engineered code (based on this implementation). I've also copied missing part of the algorithm (red blocks) from this source code. MM3 version of LZHUF is identical to the original one with just small exception, instead of using default 0x20 value to initialize dictionary, it uses value provided as an argument. This 8-bit value is different for every compressed stream stored in MM3.CC file. I guessed that it might be value of the most occurring byte inside uncompressed stream and I was right.
MM3.CC Packer/Unpacker
Having all this work behind me, I wanted to properly finish it with some working tool that in the future could be used by someone else. CC file format is described on the Xeen Wiki, but this description is valid only for CC files from Might and Magic IV and V. MM3.CC has similar structure to its successors, but there are some differences regarding file name hashing and (of course) compression. File header and table of content is exactly the same as described on Xeen Wiki:
struct FileEntry; struct FileHeader { uint16_t NumberOfFileEntries FileEntry FileEntries[NumberOfFileEntries]; }; struct FileEntry { uint16_t hash; uint16_t offsetLo; uint8_t offsetHi; uint16_t compressedSize; // includes 4 bytes header uint8_t padding; }; |
FileEntries array is encrypted by below algorithm (the same as on Xeen Wiki):
void encryptHeader(uint8_t* buf, size_t size) { uint8_t key = 0xAC; for (size_t i = 0; i < size; i++) { buf[i] = _rotr8(buf[i] - key, 2); key += 0x67; } } void decryptHeader(uint8_t* buf, size_t size) { uint8_t key = 0xAC; for (size_t i = 0; i < size; i++) { buf[i] = _rotl8(buf[i], 2) + key; key += 0x67; } } |
Files inside CC container are identified by 16-bit hash (FileEntry.hash):
uint16_t hashFileName(const char* fileName) { uint16_t hash = 0; while (0 != *fileName) { uint8_t c = ((*fileName & 0x7F) < 0x60) ? *fileName : *fileName - 0x20; hash = _rotl16(hash, 9); // xchg bl, bh | rol bx, 1 hash += c; fileName++; } return hash; } |
First two entries are special, not compressed text files. Those two files have hard-coded file size in the MM3 executable, so it is better not to change it too much, as the game will read always the same number of bytes. All other entries are compressed blocks of data with a small descriptor at the beginning of each block:
{ uint16_t decompressionInitializer; uint16_t decompressedSize; } |
decompressionInitializer could be uint8_t as it always stores the same 8-bit value in the high and low 8 bits. I'm not sure why it is stored like this. decompressedSize is stored as a big-endian value, which I find weird as well. Another strange thing is that after re-compression with my tool, MM3.CC file shrunk by 33kB. I've also prepared list of file names gathered from MM3.EXE to decode proper file names during unpacking (list isn't full, I'm missing 15 names out of 556). That's pretty much it, below you can find a link to github repository with MM3.CC file packer/unpacker:
https://github.com/rwfpl/rewolf-mm3-dumper
Compression is taken from standard LZHUF implementation with some small changes, decompression is the effect of 2-3 days of reverse engineering as described earlier. Both compressor and decompressor lacks buffer security checks, so please don't use it for anything more serious than modding MM3. Usage is very simple:
x:\mm3>mm3_cc_dumper.exe

Might and Magic III CC file packer/unpacker v1.0
Copyrigh (c) 2015 ReWolf
http://blog.rewolf.pl

Usage:

Unpack: mm3_cc_dumper.exe dump input_file.cc
Pack:   mm3_cc_dumper.exe pack input_directory output_file.cc
I hope all of you enjoyed this (maybe a bit too long) piece of history.
Nice one ReWolf, I’m surprised DiE detected the packer.
Russian translation:
http://habrahabr.ru/post/264947/
Wow ;) is it the real translation or just google translate ?
@ReWolf
Real.:)
“Wow ;) is it the real translation or just google translate ?”
Real.
Hi Revolf. A few weeks ago i have read this post. I really liked it. I have saw that you very good and skilled reverse engineer.
I would like to ask you. Can you see and extract some sprites from kknd extreme game. I will make a rebuild of this game in unity 3d engine.
I understand that is not simple, but if you have not time you can guide me by manuals and docs.
Please write me email. We can discuss some details.
I’ve sent you an e-mail.
ReWolf, great post and thank you for sharing the code. Unfortunately I was unable to compile it with VS2008 and VS2010. Would it be too much to ask you to upload the binaries of your dumper/packer?
I’ve uploaded binary to github: https://github.com/rwfpl/rewolf-mm3-dumper/releases/tag/v1.0_x86
@ReWolf
Excellent! Thank you very much.
Hi, any objections to me porting rwf_lzhuf_decompress to java for use in https://github.com/busyDuckman/OpenXeen.
I’m not 100% sure what licence openXeen will adopt. but I seek an arrangement where: A) I give you credit for the accomplishment and work related to mm3 decompression. B) I then proceed to do stuff without having to worry about licence conflicts or usage restrictions.
As long as the OpenXeen stays free you have my permission to use/rewrite this code to any language you want :)
Thanks for the blog post. A great window into reverse engineering old DOS games and assets. I’ve been interested in this lately, but the barrier to entry is very high.
imo, there is a lack of information on this subject. Maybe look into making YouTube videos on reverse engineering old games. I’d watch em. Maybe you can become the next Ghidra Ninja (reverse engineering YouTuber with 38k subs)
Good luck in your endeavors : )